Tensorflow是Google在2015年11月开源的机器学习框架,来源了Google内部的深度学习框架DistBelief。由于其良好的架构,分布式架构支持以简单易用,自开源以来得到广泛的关注。

Tensorflow

Tensorflow是什么

Tensorflow 是一个采用数据流图(data flow graphs)技术来进行数值计算的开源软件库。


tensorflow

其中Tensor代表传递的数据为张量(多维数组), Flow代表使用计算图进行运算。数据流图是一个有向图,使用节点(nodes) 和线(edges)来描述数学计算。节点一般用来表示数学操作(operation),但也可以表示数据输入的起点和输出的终点。表示节点之间的输入/输出关系。这些数据边可以传送维度可动态调整的多维数据数组,即张量(Tensor)

Tensorflow的特点

优点:

  • 由Google开发、维护,因此可以保障支持、开发的持续性。
  • 简单易用,并且社区还有很多的模型封装(比如: keras和skflow等)
  • 灵活高效,即可以使用CPU,也可以使用GPU
  • 开放活跃的社区
  • 支持网络训练的低级,高级接口

缺点:

  • 计算图是纯Python的,因此速度很慢
  • 图构造是静态的,意味着图必须先被编译在运行

Tensorflow的基础知识

张量

张量是对矢量和矩阵向潜在的更高维度的泛化。Tensorflow在内部将张量表示为基本数据类型的n维数组。可以简单的将它理解为一个多维数组:

1
2
3
4
3                           # 这个是0阶张量,就是标量,shape = []
[1.,2.,3.] # 这个是1阶张量,就是向量,shape = [3]
[[1.,2.,3.],[4.,5.,6.]] # 这个是2阶张量,就是二维数组,shape = [2, 3]
[[[1.,2.,3.]],[[7.,8.,9.]]] # 这个是3阶张量,就是三维数组,shape = [2,1,3]

TensorFlow内部使用tf.Tensor类的实例来表示张量,每个tf.Tensor有两个属性:

  • dtype Tensor: 存储的数据类型,可以为tf.float32,tf.int32, tf.string
  • shape Tensor: 存储的多维数组中每个维度的数组的元素的个数。

通过一个简单的示例来看下Tensorflow的张量:
注意:使用前需要安装Tensorflow

1
2
3
4
5
6
7
8
9
10
11
12
13
14
15
16
17
Python 2.7.12 (default, Dec  4 2017, 14:50:18)
[GCC 5.4.0 20160609] on linux2
Type "help", "copyright", "credits" or "license" for more information.
>>> import tensorflow as tf
>>> tensor0=tf.constant(3, dtype=tf.int32)
>>> tensor1=tf.constant([3.,4.1,5.2], dtype=tf.float32)
>>> tensor2=tf.constant([['apple','orange'],['potato','tomato']], dtype=tf.string)
>>> tensor3=tf.constant([[[5], [6], [7]], [[4], [3], [2]]])
>>> print(tensor0)
Tensor("Const:0", shape=(), dtype=int32)
>>> print(tensor1)
Tensor("Const_1:0", shape=(3,), dtype=float32)
>>> print(tensor2)
Tensor("Const_2:0", shape=(2, 2), dtype=string)
>>> print(tensor3)
Tensor("Const_3:0", shape=(2, 3, 1), dtype=int32)
>>>

计算图(Graph)和会话(Session)

Tensorflow的主要特色就是计算图方法。基本上所有的Tensorflow代码都包含两个重要的部分:

  • 创建计算图,表示计算的数据流
  • 运行会话,执行图中的运算
计算图(Graph)

如官网所说: 一个计算图是被组织到图节点的一系列Tensorflow运算。首先,什么是节点和运算?最好的解释方式是,举个例子。假设我们为函数 f(x,y)=x^2y+y+2 编写代码。Tensorflow中的计算图如下所示:


tensorflow

如上图所示,计算图有一系列由边互相连接的节点构成。每个节点称为op,即operation的缩写。因此每个节点代表一个运算,可能是张量运算或生成张量的操作。每个节点以零或者更多的张量为输入,并生成一个张量作为输出。

我们来构建一个简单的计算图:

1
2
3
4
5
6
>>> import tensorflow as tf
>>> a = 2
>>> b = 3
>>> c = tf.add(a, b, name='Add')
>>> print(c)
Tensor("Add:0", shape=(), dtype=int32)

上面的代码已经将计算图构建完成。但是并不能对其进行执行。我们可以把上面的计算图比作Python中的函数定义。它不会为你执行任何计算(就像函数定义不会有任何的执行结果),它定义计算的操作。

会话(Session)

在Tensorflow中,所有不同的变量和运算都存储在计算图。所以在我们构建完模型所需要的图之后,还需要打开一个会话(Session)来运行整个计算图。在会话中,我们可以将所有的计算分配到可用的CPU和GPU资源中。举个简单的例子,运行计算图并获取c的值:

1
2
3
4
>>> sess = tf.Session()
>>> print(sess.run(c))
5
>>> sess.close()

这些代码创建一个Session()对象,然后调用run方法来运行上面的计算图。计算完毕之后需要关闭会话来帮助系统回收资源。

TensorBoard

为了方便Tensorflow的建模和调优,Google还为Tensorflow开发了一款可视化的工具:TensorBoard。我们通过一个简单的现象线性回归模型来看下TessorBoard。

1
2
3
4
5
6
7
8
9
10
11
12
13
14
15
16
17
18
19
20
21
22
23
24
25
26
27
28
29
30
31
32
33
34
35
36
37
38
39
40
41
42
43
44
45
46
47
48
import tensorflow as tf

# linear_model: y = W*x + b
W = tf.Variable([.1], dtype=tf.float32)
b = tf.Variable([-.1], dtype=tf.float32)

x = tf.placeholder(tf.float32, name='x')
y = tf.placeholder(tf.float32, name='y')

# create linear model
linear_model = W * x + b

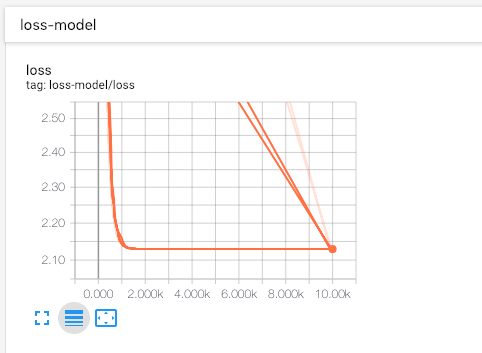
# create loss model
with tf.name_scope("loss-model"):
loss = tf.reduce_sum(tf.square(linear_model -y))
#Add scalar to the output of the loss model to observe the convergence curve of loss
tf.summary.scalar("loss", loss)

# create a optimizer use Gradient Descent algorithm.
optimizer = tf.train.GradientDescentOptimizer(0.001)
train = optimizer.minimize(loss)

# create session use compute
sess = tf.Session()
init = tf.global_variables_initializer()
sess.run(init)

# merges all sunmaries collected in the default graph
merged = tf.summary.merge_all()

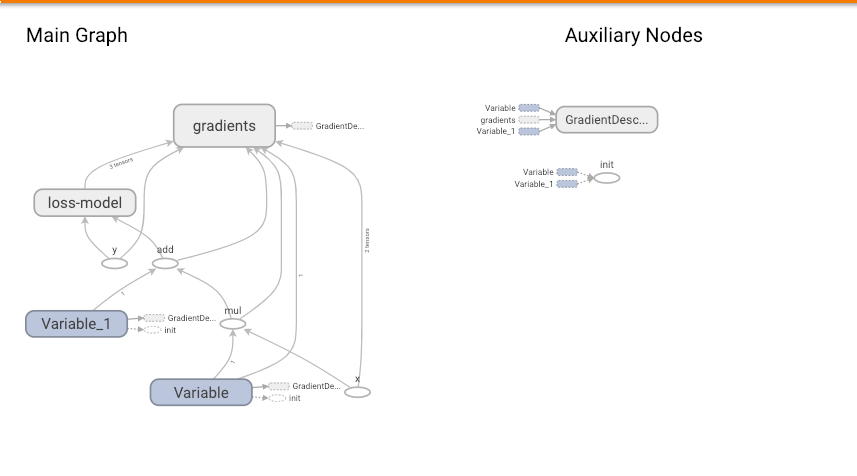
#All data generated by the model run is saved to the /tmp/tensorflow folder for use by TensorBoard
writer = tf.summary.FileWriter('/tmp/tensorflow', sess.graph)

# train dataset
x_train = [1, 2, 3, 6, 8]
y_train = [4.8, 8.5, 10.4, 21.0, 25.3]

# Training 10,000 times
for i in range(10000):
# Pass in merge during training
summary, _ = sess.run([merged, train], {x: x_train, y: y_train})
# collected output train data
writer.add_summary(summary, i)

current_W, current_b, current_loss = sess.run([W, b, loss], {x: x_train, y: y_train})

# Print the results after training
print("After train W: %s b: %s, loss: %s" % (current_W, current_b, current_loss))

运行上面的代码后,训练过程产生的数据就保存在/tmp/tensorflow文件夹下。可以使用下面的命令来启动TensorBoard:

1
tensorboard --logdir /tmp/tensorflow

通过浏览器的http://localhost:6006就能看到我们的模型数据。在 SCALARS 页面我们可以看到我们通过 tf.summary.scalar(“loss”, loss)设置的loss收敛曲线,从曲线图中可以看出在训练了大概2000次的时候loss就已经收敛的差不多了。


tensorflow

在 GRAPHS 页面可以看到我们构建的模型的数据流图:


tensorflow

Tensorflow 分布式训练

分布式训练策略

  • 模型并行

    所谓模型并行指的是将模型部署到很多设备上(设备可能分布在不同的机器上)运行,比如:多个机器的GPUs。当神经网络模型很大时,由于显存的限制,它是难以跑在单个GPU上,这个时候就需要模型并行。但是这种分布式训练方式不常使用。

  • 数据并行
    深度学习模型最常用的分布式训练策略是数据并行,因为训练时的一个重要原因是训练的数据量很大。数据并行就是在很多设备上放置相同的模型,并且各个设备采用不同的训练样本来对模型进行训练。训练深度学习模型常采用的是batch SGD方法,采用数据并行,可以每个设备都训练不同的batch,然后收集这些梯度用于模型参数的更新。采用数据并行策略,使用256个GPUs,每个GPU读取32个图片进行训练,如下图所示,这样相当于采用非常大的batch( 32\times 256=8192 )来训练模型。


    tensorflow

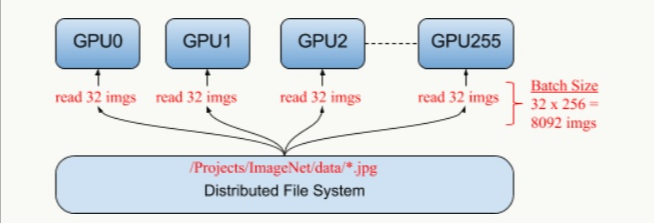
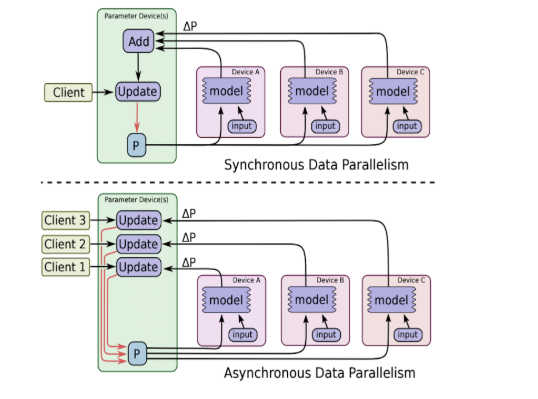
    数据并行可以是同步(synchronous),也可以是异步(asynchronous)。所谓同步指的是所有的设备都是采用相同的模型参数来训练,等待所有设备的batch训练完成后,收集它们的梯度然后取均值,然后执行模型的一次参数更新。这相当于通过聚合很多设备上的batch形成一个很大的batch来训练模型,通过这种方式能使学习速率得到不错的效果。同步训练看起来不错,但是实现需要各个设备的计算能力均衡,而且要求集群的通信也要均衡,类似木桶效应,一个拖油瓶会严重拖慢训练进度,所以同步训练方式相对来说训练速度会慢一些。异步训练中,各个设备完成一个mini-batch训练之后,不需要等待其它节点,直接去更新模型的参数,这样总体会训练速度会快很多。但是异步训练的一个很严重的问题是梯度失效问题(stale gradients),刚开始所有设备采用相同的参数来训练,但是异步情况下,某个设备完成一步训练后,可能发现模型参数其实已经被其它设备更新过了,此时这个梯度就过期了,因为现在的模型参数和训练前采用的参数是不一样的。由于梯度失效问题,异步训练虽然速度快,但是可能陷入次优解(sub-optimal training performance)。异步训练和同步训练在TensorFlow中不同点如下图所示:


    tensorflow

分布式训练介绍

通过多GPU并行的方式可以有很好的加速效果,然后一台机器上所支持的GPU是有限的,因此需要分布式的训练方式来支持多机器的分布式训练。

相关概念
  • 客户端(client): 客户端是一个用于建立Tensorflow计算图并创立于集群进行交互的会话层(Session)的程序。一般客户端通过Python或C++实现。一个独立的客户端进程可以同时与多个Tensorflow的服务端相连,同时一个独立的服务端也可以与多个客户端相连。
  • 集群(Cluster): 一个Tensorflow的集群里包含了一个或多个Job,每一个作业又可以拆分成一个或多个任务(task)。集群对象可以通过tf.train.ClusterSpec来定义。
  • 作业(job): 一个作业可以拆分成多个具有相同目的的任务(task),比如说,一个称之为 ps(parameter server,参数服务器) 的作业中的任务主要是保存和更新变量,而一个名为 work(工作)的作业一般是管理无状态且主要从事计算的任务。一个作业中的任务可以运行于不同的机器上,作业的角色也是灵活可变的,比如说称之为”work”的作业可以保存一些状态。
  • 主节点服务逻辑(master service): 一个RPC服务程序可以用来远程连接一系列的分布式设备,并扮演一个会话终端的角色,主服务程序实现了一个tensorflow:session的接口并负责通过工作节点的服务进程与工作的任务进行通信。所有的主服务程序都有了主节点的服务逻辑。
  • 任务(Task): 任务相当于一个特定的Tensorflow服务端,其相当于一个独立的进程,该进程属于特定的作业并在作业找那个拥有对应的序号。
  • Tensorflow 服务端(Tensorflow Server): 一个运行了tf.train.Server实例的进程,其为集群中的一员,并有主节点和工作节点之分。
  • 工作节点的服务逻辑 (Worker service) : 其为一个可以使用本地设备对部分图进行计算的 RPC 逻辑,一个工作节点的服务逻辑实现了 worker_service.proto 接口, 所有的 TensorFlow 服务端均包含工作节点的服务逻辑。

它们直接的关系图如下:


tensorflow

Tensorflow使用tf.train.ClusterSpec来表示一个cluster。


tensorflow

其中cluster接收一个map,并且map中包含了各个task所在host的主机地址,这个cluster共包含两类job: ps和worker。

创建好了cluster,需要创建各个task的server, 使用tf.train.Server函数,比如创建第一个worker的server:

1
server = tf.train.Server(cluster, job_name="worker", task_index=0)

上面各个task的server创建完成之后,就可以在构建Graph时使用tf.device来调用该cluster中的各个server并指定该op在CPU还是GPU上计算。具体如下面代码实例:

1
2
3
4
5
6
7
8
9
10
11
12
13
14
15
16
17
18
with tf.device("/job:ps/task:0"):
weights_1 = tf.Variable(...)
biases_1 = tf.Variable(...)

with tf.device("/job:ps/task:1"):
weights_2 = tf.Variable(...)
biases_2 = tf.Variable(...)

with tf.device("/job:worker/task:7"):
input, labels = ...
layer_1 = tf.nn.relu(tf.matmul(input, weights_1) + biases_1)
logits = tf.nn.relu(tf.matmul(layer_1, weights_2) + biases_2)
# ...
train_op = ...

with tf.Session("grpc://worker7.example.com:2222") as sess:
for _ in range(10000):
sess.run(train_op)

更多关于Tensorflow分布式训练的可以查看:
Distributed TensorFlow
分布式TensorFlow入门教程

下面是一个分布式训练的完成例子:

1
2
3
4
5
6
7
8
9
10
11
12
13
14
15
16
17
18
19
20
21
22
23
24
25
26
27
28
29
30
31
32
33
34
35
36
37
38
39
40
41
42
43
44
45
46
47
48
49
50
51
52
53
54
55
56
57
58
59
60
61
62
63
64
65
66
67
68
69
70
71
72
73
74
75
76
77
78
79
80
81
82
83
84
85
import argparse
import sys

import tensorflow as tf

FLAGS = None


def main(_):
ps_hosts = FLAGS.ps_hosts.split(",")
worker_hosts = FLAGS.worker_hosts.split(",")

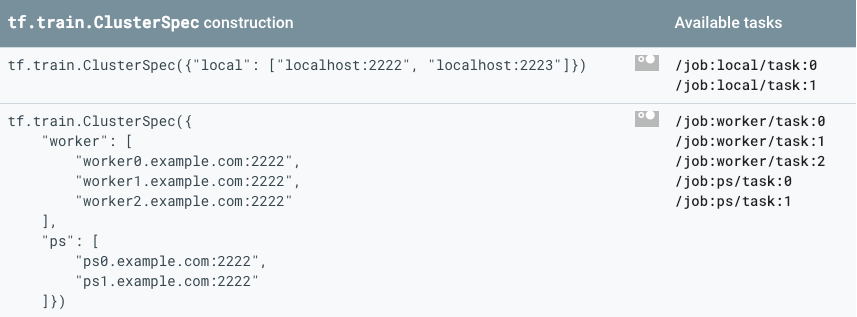
# Create a cluster from the parameter server and worker hosts.
cluster = tf.train.ClusterSpec({"ps": ps_hosts, "worker": worker_hosts})

# Create and start a server for the local task.
server = tf.train.Server(cluster,
job_name=FLAGS.job_name,
task_index=FLAGS.task_index)

if FLAGS.job_name == "ps":
server.join()
elif FLAGS.job_name == "worker":

# Assigns ops to the local worker by default.
with tf.device(tf.train.replica_device_setter(
worker_device="/job:worker/task:%d" % FLAGS.task_index,
cluster=cluster)):

# Build model...
loss = ...
global_step = tf.contrib.framework.get_or_create_global_step()

train_op = tf.train.AdagradOptimizer(0.01).minimize(
loss, global_step=global_step)

# The StopAtStepHook handles stopping after running given steps.
hooks=[tf.train.StopAtStepHook(last_step=1000000)]

# The MonitoredTrainingSession takes care of session initialization,
# restoring from a checkpoint, saving to a checkpoint, and closing when done
# or an error occurs.
with tf.train.MonitoredTrainingSession(master=server.target,
is_chief=(FLAGS.task_index == 0),
checkpoint_dir="/tmp/train_logs",
hooks=hooks) as mon_sess:
while not mon_sess.should_stop():
# Run a training step asynchronously.
# See <a href="./../api_docs/python/tf/train/SyncReplicasOptimizer"><code>tf.train.SyncReplicasOptimizer</code></a> for additional details on how to
# perform *synchronous* training.
# mon_sess.run handles AbortedError in case of preempted PS.
mon_sess.run(train_op)


if __name__ == "__main__":
parser = argparse.ArgumentParser()
parser.register("type", "bool", lambda v: v.lower() == "true")
# Flags for defining the tf.train.ClusterSpec
parser.add_argument(
"--ps_hosts",
type=str,
default="",
help="Comma-separated list of hostname:port pairs"
)
parser.add_argument(
"--worker_hosts",
type=str,
default="",
help="Comma-separated list of hostname:port pairs"
)
parser.add_argument(
"--job_name",
type=str,
default="",
help="One of 'ps', 'worker'"
)
# Flags for defining the tf.train.Server
parser.add_argument(
"--task_index",
type=int,
default=0,
help="Index of task within the job"
)
FLAGS, unparsed = parser.parse_known_args()
tf.app.run(main=main, argv=[sys.argv[0]] + unparsed)

使用trainer.py脚本开启两个ps和两个worker,具体操作如下:

1
2
3
4
5
6
7
8
9
10
11
12
13
14
15
16
17
18
19
20
# On ps0.example.com:
$ python trainer.py \
--ps_hosts=ps0.example.com:2222,ps1.example.com:2222 \
--worker_hosts=worker0.example.com:2222,worker1.example.com:2222 \
--job_name=ps --task_index=0
# On ps1.example.com:
$ python trainer.py \
--ps_hosts=ps0.example.com:2222,ps1.example.com:2222 \
--worker_hosts=worker0.example.com:2222,worker1.example.com:2222 \
--job_name=ps --task_index=1
# On worker0.example.com:
$ python trainer.py \
--ps_hosts=ps0.example.com:2222,ps1.example.com:2222 \
--worker_hosts=worker0.example.com:2222,worker1.example.com:2222 \
--job_name=worker --task_index=0
# On worker1.example.com:
$ python trainer.py \
--ps_hosts=ps0.example.com:2222,ps1.example.com:2222 \
--worker_hosts=worker0.example.com:2222,worker1.example.com:2222 \
--job_name=worker --task_index=1

Tensorflow结合kubernetes进行分布式训练

上面简单的介绍了下Tensorflow的基础知识以及Tensorflow是如何进行分布式训练的。但是对于资源的隔离和管理以及调度等场景还是不能很好的解决,接下来介绍下基于kubeflow对Tensorflow的模型进行大规模的分布式训练。

kubeflow安装

之前的文章已经介绍了,这里就不详细介绍,具体的安装请看之前的文章:部署kubeflow环境

分布式Tensorflow与Kubenetes结合

使用kubernetes对机器学习的训练任务进行管理的好处:

集群管理:

  • 计算资源调度支持- CPU和GPU
  • 训练任务生命周期管理- CRD&Controller
  • 资源隔离 - Linux Namespace
  • 监控,日志,告警 - 容器云平台提供的能力

网络:

  • 服务发现 - Service(headless)

存储:

  • 存储持久化 - PV&PVC&CSI


    tensorflow

TFJob

TFJob是kubernetes的一个自定义资源使你能够运行Tensorflow的训练任务在kubernetes上。kubeflow实现的TfJobtf-operator项目。

TFJob是kubernetes一个对象资源,定义的格式和其它的kubernetes资源一样。具体的实例如下:

1
2
3
4
5
6
7
8
9
10
11
12
13
14
15
16
17
18
19
20
21
22
23
24
25
26
27
28
29
30
31
32
33
34
35
apiVersion: "kubeflow.org/v1alpha2"
kind: "TFJob"
metadata:
name: "dist-mnist-for-e2e-test"
spec:
tfReplicaSpecs:
PS:
replicas: 1 # 定义一个ps
restartPolicy: Never
template:
spec:
containers:
- name: tensorflow
image: xigang/tf-mnist-distributed:gpu
command: ["python", "/app/main.py"]
ports:
- containerPort: 2222
name: tfjob-port
restartPolicy: OnFailure
Worker:
replicas: 2 # 定义两个worker
restartPolicy: Never
template:
spec:
containers:
- name: tensorflow
image: xigang/tf-mnist-distributed:gpu
command: ["python", "/app/main.py"]
ports:
- containerPort: 2222
name: tfjob-port
imagePullPolicy: Always
resources:
limits:
nvidia.com/gpu: 1

通过上面的yaml文件,我们就能在kubernetes上创建我们的训练任务了。执行下面的命令:

1
2
# kubectl  create -f mnist_multi_gpu.yaml
tfjob.kubeflow.org/dist-mnist-for-e2e-test created

查看tfjobs任务是否创建成功,并且状态是否处于ready状态:

1
2
3
# kubectl get tfjobs
NAME AGE
dist-mnist-for-e2e-test 47s
1
2
3
4
5
# kubectl get pods
NAME READY STATUS RESTARTS AGE
dist-mnist-for-e2e-test-ps-0 1/1 Running 0 53s
dist-mnist-for-e2e-test-worker-0 1/1 Running 0 53s
dist-mnist-for-e2e-test-worker-1 1/1 Running 0 53s

一切正常的情况下,查看worker的训练日志:

1
2
3
4
5
6
7
8
9
10
11
12
13
14
15
16
17
18
19
20
21
22
23
24
25
26
27
28
29
30
31
32
# docker logs -f 265d4ae426d6
/usr/local/lib/python2.7/dist-packages/h5py/__init__.py:36: FutureWarning: Conversion of the second argument of issubdtype from `float` to `np.floating` is deprecated. In future, it will be treated as `np.float64 == np.dtype(float).type`.
from ._conv import register_converters as _register_converters
2019-01-30 07:37:21.960547: I tensorflow/core/platform/cpu_feature_guard.cc:137] Your CPU supports instructions that this TensorFlow binary was not compiled to use: SSE4.1 SSE4.2 AVX AVX2 FMA
2019-01-30 07:37:22.285116: I tensorflow/core/common_runtime/gpu/gpu_device.cc:1105] Found device 0 with properties:
name: Tesla K80 major: 3 minor: 7 memoryClockRate(GHz): 0.8235
pciBusID: 0000:05:00.0
totalMemory: 11.92GiB freeMemory: 11.68GiB
2019-01-30 07:37:22.285154: I tensorflow/core/common_runtime/gpu/gpu_device.cc:1195] Creating TensorFlow device (/device:GPU:0) -> (device: 0, name: Tesla K80, pci bus id: 0000:05:00.0, compute capability: 3.7)
2019-01-30 07:37:27.471978: I tensorflow/core/distributed_runtime/rpc/grpc_channel.cc:215] Initialize GrpcChannelCache for job ps -> {0 -> dist-mnist-for-e2e-test-ps-0:2222}
2019-01-30 07:37:27.472009: I tensorflow/core/distributed_runtime/rpc/grpc_channel.cc:215] Initialize GrpcChannelCache for job worker -> {0 -> localhost:2222, 1 -> dist-mnist-for-e2e-test-worker-1:2222}
2019-01-30 07:37:27.474101: I tensorflow/core/distributed_runtime/rpc/grpc_server_lib.cc:324] Started server with target: grpc://localhost:2222
WARNING:tensorflow:From /app/main.py:202: __init__ (from tensorflow.python.training.supervisor) is deprecated and will be removed in a future version.
Instructions for updating:
Please switch to tf.train.MonitoredTrainingSession
2019-01-30 07:37:28.924878: I tensorflow/core/distributed_runtime/master_session.cc:1017] Start master session 23fe02df8676c506 with config:
Worker 0: Initializing session...
Extracting /train/tensorflow/input_data/train-images-idx3-ubyte.gz
Extracting /train/tensorflow/input_data/train-labels-idx1-ubyte.gz
Extracting /train/tensorflow/input_data/t10k-images-idx3-ubyte.gz
Extracting /train/tensorflow/input_data/t10k-labels-idx1-ubyte.gz
Accuracy at step 0: 0.1445
Accuracy at step 10: 0.7489
Accuracy at step 20: 0.8691
Accuracy at step 30: 0.8885
Accuracy at step 40: 0.895
Accuracy at step 50: 0.8975
Accuracy at step 60: 0.9098
Accuracy at step 70: 0.9185
Accuracy at step 80: 0.9229
Accuracy at step 90: 0.9283
Adding run metadata for 99

Tensorflow是如何与kubernetes结合?

上面已经描述关于Tensorflow的分布式训练的基本原理,需要指定tf.train.ClusterSpec并基于各个task创建tf.train.Server。但是需要指定相关的host和index信息,但是使用kubernetes进行调度时,由于Pod的IP会从网络池中获取,事先是不知道的。而kuberentes的做法是在容器创建成功之后将Tensorflow分布式训练需要的相关信息已环境变量的方式注入到容器中,这时当容器内部的task执行时,就会通过TF_CONFIG获取相关的环境变量并解析该TF_CONFIG环境变量进行后续的处理。

我们exec进入到worker容器中会发现一个TF_CONFIG的环境变量:

1
2
3
4
5
6
7
8
9
10
11
TF_CONFIG={
"cluster":{
"ps":["dist-mnist-for-e2e-test-ps-0:2222"],
"worker":["dist-mnist-for-e2e-test-worker-0:2222","dist-mnist-for-e2e-test-worker-1:2222"]
},
"task":{
"type":"worker",
"index":0
},
"environment":"cloud"
}

而需要训练的模型通过该TF_CONFIG环境变量获取相关的信息,下面是mnist模型获取TF_CONFIG信息的部分代码片段:


tensorflow

参考

https://www.tensorflow.org/guide/graphs
https://www.tensorflow.org/deploy/distributed
https://www.kubeflow.org/docs/components/tftraining/
https://zhuanlan.zhihu.com/p/35083779
https://www.jiqizhixin.com/articles/2017-12-10-5
https://blog.csdn.net/geyunfei_/article/details/78782804