上篇文章介绍了kubernetes使用Ceph RBD进行数据持久化存储 ,在总结部分也说了RBD 块存储设备,只支持单节点的读写和多节点只读的功能,但是有些业务需要多节点对数据进行读写,这就需要使用我们接下来介绍的cephfs文件系统,使用它来实现多节点数据的读写。
cephfs介绍 cephfs是ceph提供的兼容POSIX协议的文件系统,对比RBD和RGW功能,这个是ceph里最晚满足production ready的一个功能,它底层还是使用rados存储数据。
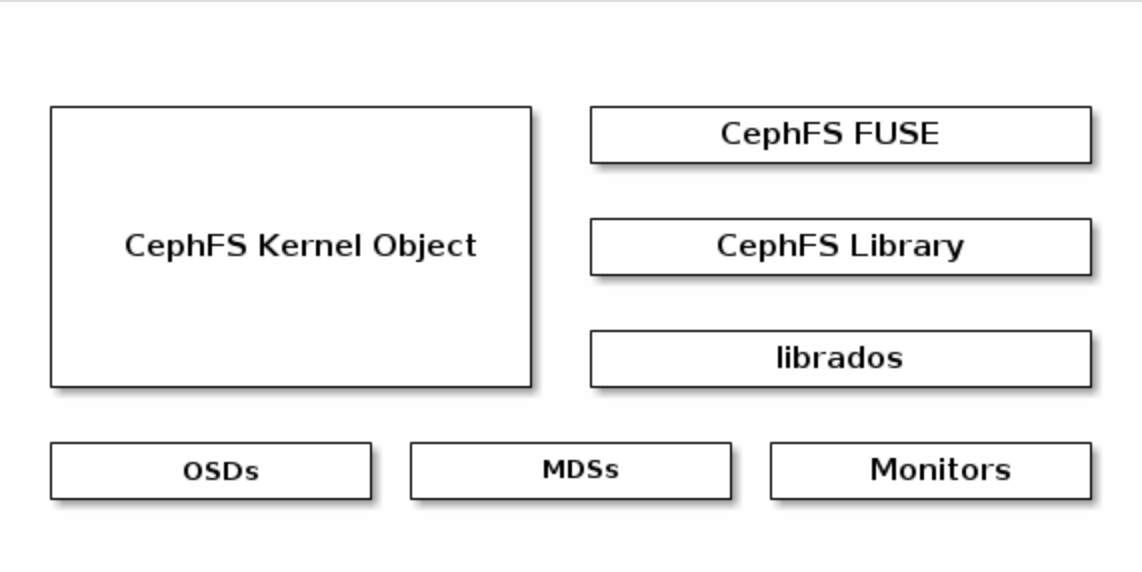
cephfs的架构
cephfs的使用方式
cephfs kernel module
cephfs-fuse
从上面的架构图中可以看到,cephfs-fuse的方式比cephfs kernel module方式在性能方面会差一些。
创建cephfs 1 2 3 4 5 6 7 8 9 10 11 12 13 14 15 16 17 18 19 20 21 22 23 24 25 26 27 28 29 30 31 32 33 34 35 36 37 38 1 . 创建云数据服务器MDS [root@ceph -admin ~] [root@ceph -admin ~] e8: 1 /1 /1 up {0 =ceph-03 =up: active}, 3 up: standby 检查是否启动成功: [root@ceph -admin ~] ceph 510 0 .0 0 .7 675592 28964 ? Ssl Apr02 2 : 20 /usr/bin/ceph-mds -f --cluster ceph --id ceph-admin --setuser ceph --setgroup ceph 2 .创建 cephfs [root@ceph -admin ~] pool 'cephfs_data' created [root@ceph -admin ~] pool 'cephfs_metadata' created [root@ceph -admin ~] new fs with metadata pool 2 and data pool 1 [root@ceph -admin ~] name: cephfs, metadata pool: cephfs_metadata, data pools: [cephfs_data ] 3 . 创建认证文件 admin.secret[root@ceph -admin ~] [client.admin] key = AQBJd7dar15/HhAAqvUP2INiJhfA6uJ5AQ914Q== caps mds = "allow *" caps mon = "allow *" caps osd = "allow *" [root@ceph -admin ~] AQBJd7dar15/HhAAqvUP2INiJhfA6uJ5AQ914Q== 4 .挂载cephfs文件系统[root@ceph -admin ~] [root@ceph -admin ~] 查看是否挂载成功: [root@ceph -admin ~] mon-hosts: 6789 :/ 591 G 50 G 542 G 9 % /mnt/cephfs
上面已经成功的将cephfs挂载到了/mnt/cephfs挂载点。注意:现在一个ceph存储集群只能创建一个cephfs,默认cephfs是不支持多个fs的,对多个cephfs的支持还在试验阶段的feature。http://docs.ceph.com/docs/master/cephfs/
kubernetes使用cephfs数据持久化 kubernetes使用cephfs进行数据持久化时,主要有三种方式:
使用kubernetes支持的cephfs类型volume直接挂载。
使用kubernetes支持的PV&PVC方式进行数据卷的挂载。
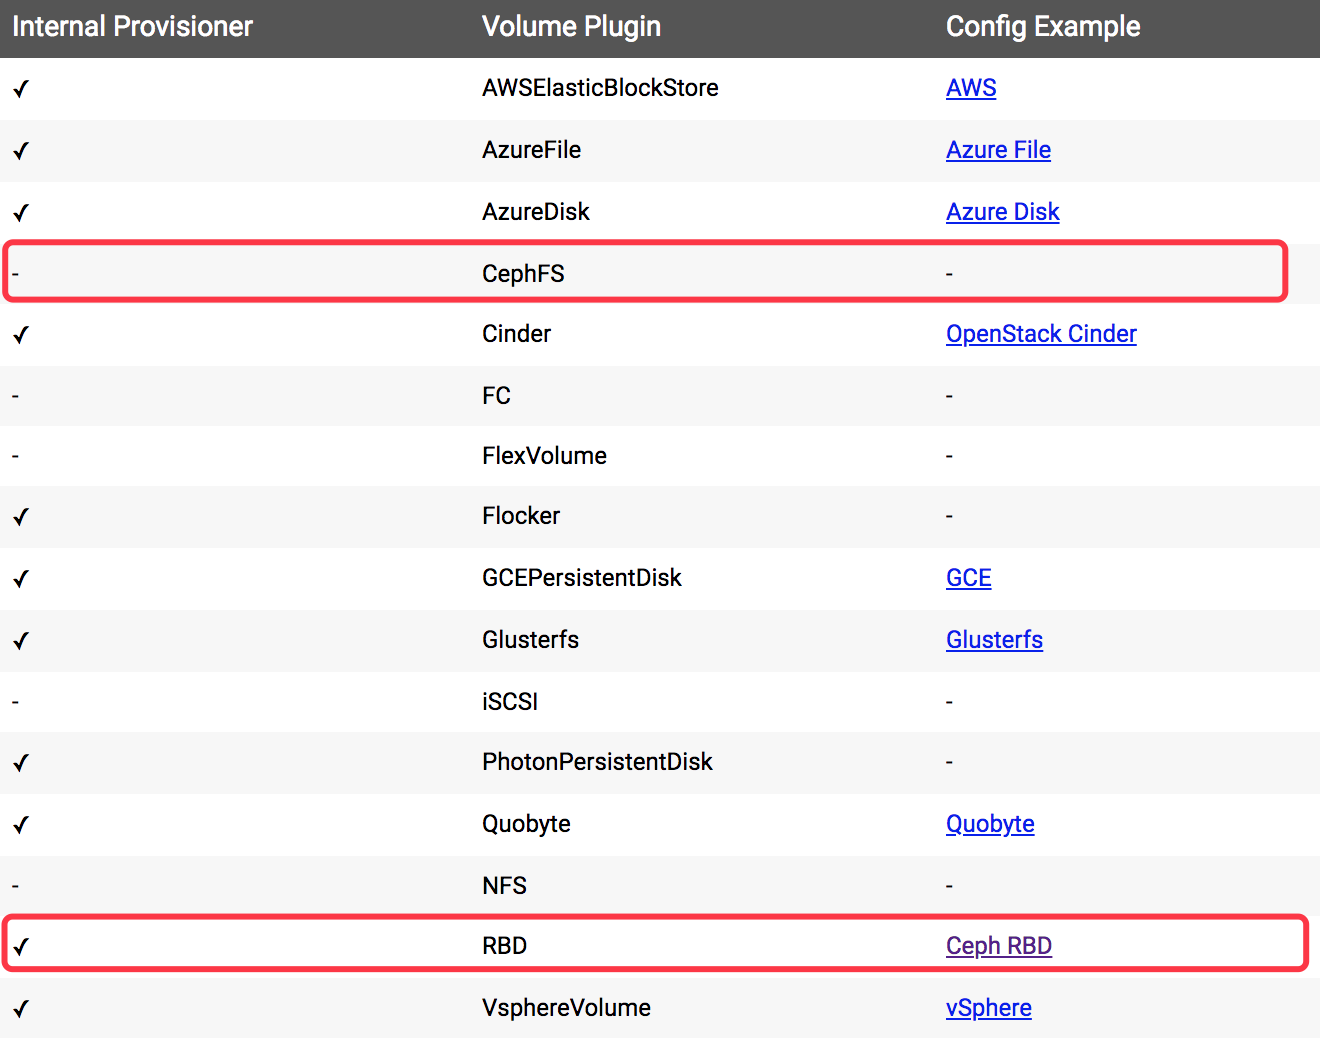
使用社区提供的一个cephfs provisioner来支持以storageClass的方式动态的分配PV,来进行挂载。kubernetes内置provisioner暂时还没有提供这个功能。
并且kubernetens使用cephfs有一些限制,是由于cephfs本身的问题导致的:
Kernel CephFS doesn’t work with SELinux, setting SELinux label in Pod’s securityContext will not work.
Kernel CephFS doesn’t support quota or capacity, capacity requested by PVC is not enforced or validated.
Currently each Ceph user created by the provisioner has allow r MDS cap to permit CephFS mount.
好了,下面我们会分别实验这几种方式来对cephfs文件系统进行挂载。
使用kubernetes支持的cephfs类型volume直接挂载 cephfs卷允许将现有的cephfs卷挂载到你的Pod中,与emptyDir类型不同的是,emptyDir会在删除Pod时把数据清除掉,而cephfs卷的数据会被保留下来,仅仅是被卸载,并且cephfs可以被多个设备进行读写。
我们以官方提供的一个例子作为实验:https://github.com/kubernetes/examples/tree/master/staging/volumes/cephfs
1.创建一个ceph secret
1
2
3
4
5
6
7
apiVersion: v1 kind: Secret metadata: name: ceph-secret type: kubernetes.io/rbd data: key: QVFCSmQ3ZGFyMTUvSGhBQXF2VVAySU5pSmhmQTZ1SjVBUTkxNFE9PQo=
注意: ceph_secret.yaml文件中key需要进行base64编码,之后在文件中使用。
1 2 secret "ceph-secret" created
2.创建一个Pod直接使用cephfs类型的volume进行挂载
1
2
3
4
5
6
7
8
9
10
11
12
13
14
15
16
17
18
19
20
21
apiVersion : v1kind : Podmetadata : name : kube-cephfs spec : containers : - name : cephfs-rw image : busybox command : ["sleep" , "60000" ] volumeMounts : - mountPath : "/mnt/cephfs" name : cephfs volumes : - name : cephfs cephfs : monitors : - mon-hosts :6789 user : admin path : / secretRef : name : ceph-secret
ok,创建我们的pod,并挂载cephfs卷:
1
2
3
4
5
# kubectl create -f cephfs.yaml pod "kube-cephfs" created # kubectl get pod kube-cephfs NAME READY STATUS RESTARTS AGE kube-cephfs 1 /1 Running 0 16 m
具体验证留给你:)
使用kubernetes支持的PV&PVC方式进行数据卷的挂载 对于PV&PVC的概念我上篇文章已经介绍过,详情请看kubernetes持久化存储Ceph RBD 。
接下来我们直接上重点:
1
2
3
4
5
6
7
8
9
10
11
12
13
14
15
16
17
18
apiVersion: v1 kind: PersistentVolume metadata: name: cephfs-pv spec: capacity: storage: 1 Gi accessModes: - ReadWriteMany cephfs: monitors: - mon-hosts: 6789 user: admin path: / secretRef: name: ceph-secret readOnly: false persistentVolumeReclaimPolicy: Delete
创建PV, 如果PV的状态为Available,则说明PV创建成功,可以提供给PVC使用。
1 2 3 4 5 persistentvolume "cephfs-pv" created NAME CAPACITY ACCESS MODES RECLAIM POLICY STATUS CLAIM STORAGECLASS REASON AGE cephfs-pv 1Gi RWX Delete Available 25s
2.创建PVC,定义的文件如下:
1
2
3
4
5
6
7
8
9
10
kind: PersistentVolumeClaimapiVersion: v1metadata: name: cephfs-pv-claimspec: accessModes: - ReadWriteMany resources: requests: storage: 1 Gi
注意:PVC的访问模式和存储大小必须和PV的匹配才能绑定成功。好了,创建我们的PVC资源:
1 2 3 4 5 persistentvolumeclaim "cephfs-pv-claim" created NAME STATUS VOLUME CAPACITY ACCESS MODES STORAGECLASS AGE cephfs-pv-claim Bound cephfs-pv 1Gi RWX 15s
3.创建Pod挂载该PVC,定义的文件如下:
1
2
3
4
5
6
7
8
9
10
11
12
13
14
15
16
17
18
19
apiVersion : v1kind : Podmetadata : labels : test : cephfs-pvc-pod name : cephfs-pv-pod2 spec : containers : - name : cephfs-pv-busybox2 image : busybox command : ["sleep" , "60000" ] volumeMounts : - mountPath : "/mnt/cephfs" name : cephfs-vol2 readOnly : false volumes : - name : cephfs-vol2 persistentVolumeClaim : claimName : cephfs-pv-claim
创建Pod,并查看cephfs卷是否挂载上:
1
2
3
4
5
# kubectl create -f cephfs-pvc-pod2.yaml pod "cephfs-pv-pod2" created # kubectl get pod cephfs-pv-pod2 NAME READY STATUS RESTARTS AGE cephfs-pv-pod2 1 /1 Running 0 15 s
具体验证留给你:)
使用cephfs provisioner动态分配PV供PVC使用 由于kubernetes官方并没有对cephfs提供类似ceph RBD动态分配PV的storageClass的功能。
补充: storageClass有一个分配器,用来决定使用哪个卷插件来分配PV.
但是社区提供了一个cephfs-provisioner 来实现这个功能,可能在使用的过程中存在一些坑。😁
接下来我们直接使用cephfs-provisioner来进行试验:
创建admin-secret.yaml
1
2
3
ceph auth get client.admin 2 >&1 |grep "key = " |awk '{print $3' } |xargs echo -n > /tmp/ secret kubectl create ns cephfs kubectl create secret generic ceph-secret-admin --from -file =/tmp/ secret --namespace=cephfs
2.启动 CephFS provisioner
详情参考:Install with RBAC roles
3.创建一个storageclass:
1
2
3
4
5
6
7
8
9
10
11
kind : StorageClassapiVersion : storage.k8s.io/v1metadata : name : cephfs namespace : cephfs provisioner : ceph.com/cephfsparameters : monitors : mon-hosts :6789 adminId : admin adminSecretName : ceph-secret-admin adminSecretNamespace : "cephfs"
检查cephfs storageClass是否创建成功:
1
2
3
4
5
kubectl create -f local -class .yaml storageclass "cephfs" created # kubectl get storageclass NAME PROVISIONER AGE cephfs ceph.com/cephfs 56 s
4.创建PVC使用cephfs storageClass动态分配PV
1
2
3
4
5
6
7
8
9
10
11
12
13
kind : PersistentVolumeClaimapiVersion : v1metadata : name : claim-local namespace : cephfs annotations : volume.beta.kubernetes.io/storage-class : "cephfs" spec : accessModes : - ReadWriteMany resources : requests : storage : 1 Gi
检查claim-local PVC是否成功的被cephfs storageClass分配PV。如果PVC的状态是Bound则代表绑定成功,如果状态是Pending or Failed则表示绑定PVC失败,请describe或者查看日志来确定问题出错在哪。
1 2 3 4 5 persistentvolumeclaim "claim-local" created NAME STATUS VOLUME CAPACITY ACCESS MODES STORAGECLASS AGE claim-local Bound pvc-e6272a45-4067-11e8-af69-f0921c10a7bc 1Gi RWX cephfs 41s
ok,绑定成功,并且cephfs storageClass成功的分配一个匹配的PV给PVC.
5.接下来我们创建一个Pod绑定该PVC,来验证是否成功的将cephfs绑定的Pod中。
1
2
3
4
5
6
7
8
9
10
11
12
13
14
15
16
17
18
19
kind : Podmetadata : labels : test : cephfs-pvc-pod name : cephfs-pv-pod1 namespace : cephfs spec : containers : - name : cephfs-pv-busybox1 image : busybox command : ["sleep" , "60000" ] volumeMounts : - mountPath : "/mnt/cephfs" name : cephfs-vol1 readOnly : false volumes : - name : cephfs-vol1 persistentVolumeClaim : claimName : claim-local
创建Pod,并检查是否挂载cephfs卷成功:)
1
2
3
4
5
# kubectl create -f test-pod.yaml -n cephfs pod "cephfs-pv-pod1" created # kubectl get pod cephfs-pv -pod1 -n cephfs NAME READY STATUS RESTARTS AGE cephfs-pv -pod1 1 /1 Running 0 20 s
ok,成功了。具体验证留给你:)
总结 kubernetes使用ceph RBD和cephfs基本上可以满足了大多数业务对数据持久化的需求,也介绍了如何使的kubernetes与ceph的结合使用,但是在真正的业务使用中,上面的这些测试时远远不够的,还需要更细粒度的进行测试。如:在使用kubernetes部署服务使用ceph进行数据存储时,服务回滚数据是保存快照,还是进行md5sum等等:)
参考 http://docs.ceph.com/docs/master/cephfs/ https://kubernetes.io/docs/concepts/storage/volumes/ https://kubernetes.io/docs/concepts/storage/storage-classes/#provisioner https://github.com/kubernetes/examples/tree/master/staging/volumes/cephfs https://github.com/kubernetes-incubator/external-storage/tree/master/ceph/cephfs